

What You Need to Know Before Installing Aluminum Gutters
Aluminum gutter installation is one of the most effective ways to protect your home from water damage — and it’s a project many handy homeowners can tackle themselves.
Here’s a quick overview of how it works:
- Inspect your fascia boards for rot or damage before starting
- Measure your roofline and calculate the correct slope (1/4 inch per 10 feet toward each downspout)
- Choose the right gutter size — 5-inch for most homes, 6-inch for larger roofs or heavy runoff areas
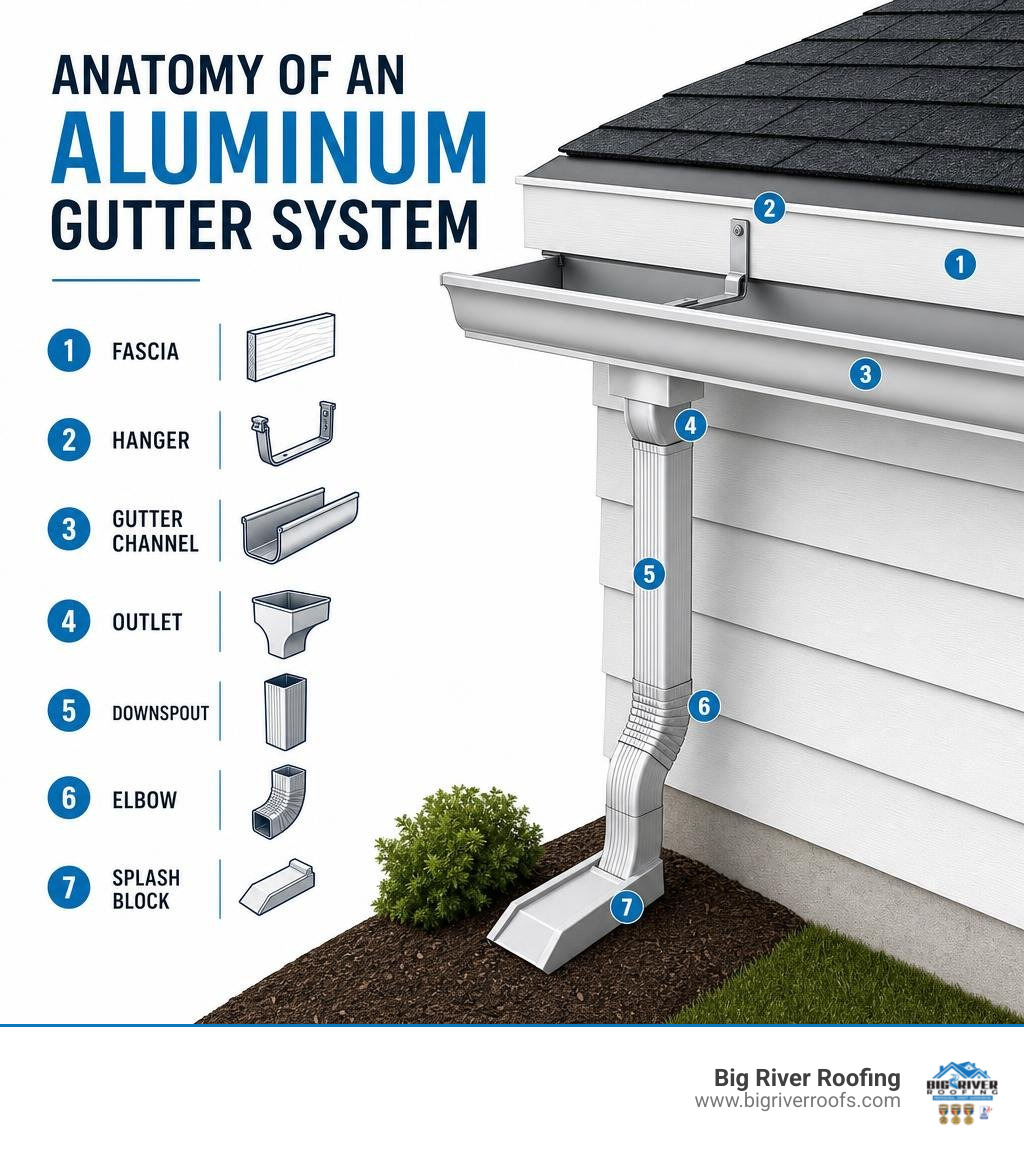
- Assemble end caps, outlet tubes, and gutter sections on the ground before hanging
- Hang gutters using hangers spaced every 24 inches, fastened into rafter tails
- Attach downspouts with elbow joints and seal all connections with polyurethane sealant
- Test the system with a garden hose to confirm proper drainage and no leaks
If your home is older or you’re dealing with storm damage alongside failing gutters, a professional installation is often the smarter call — more on that later in this guide.
Aluminum is the most popular gutter material in the U.S. for good reason. It doesn’t rust, handles temperature swings well, and costs far less than copper. For a typical home needing around 150 linear feet of gutters, professional installation runs roughly $900 to $2,250 — but with the right tools and some patience, the DIY route is within reach for most homeowners.
That said, there are situations where cutting corners on gutters leads to expensive problems: foundation erosion, fascia rot, and water intrusion behind your siding. This guide walks you through every step so you get it right the first time.
I’m Don Kovac, owner of Big River Roofing, and over the years our crew has handled aluminum gutter installation across hundreds of homes in Western Pennsylvania — from straightforward single-story replacements to complex rooflines on older farmhouses. I’ll share what actually works in the field, not just what looks good on paper.
Why Choose Aluminum Gutters for Your Home?
When planning a gutter replacement in Western Pennsylvania, you have a few material options: vinyl, steel, copper, and aluminum. While vinyl is cheap, the freezing winters in Mercer, Beaver, and Allegheny counties make it brittle. Vinyl gutters frequently crack under the weight of winter snow and ice dams. On the other end of the spectrum, steel is incredibly heavy and prone to rusting once its protective coating wears thin, while copper is gorgeous but carries a premium price tag that doesn’t fit every budget.
Aluminum strikes the perfect balance. It is lightweight, naturally rust-resistant, and highly malleable. It easily handles the heavy freeze-thaw cycles we experience in Hermitage, PA, and surrounding areas.
To help you decide between the two main types of aluminum systems, here is a quick comparison:
| Feature | Sectional Aluminum Gutters | Seamless Aluminum Gutters |
|---|---|---|
| Installation Method | DIY-friendly; bought in 10-ft or 20-ft pieces and joined with connectors. | Professional-only; custom roll-formed on-site to the exact length of your roofline. |
| Leak Risk | Higher; seams every 10 to 20 feet are natural weak points where leaks develop. | Extremely low; seams exist only at corners and downspout outlets. |
| Aesthetic Appeal | Moderate; visible seams and joints along the roofline. | High; clean, unbroken lines that enhance curb appeal. |
| Lifespan | 15–20 years (joints require regular resealing). | 20–30+ years with proper maintenance. |
| Upfront Cost | Lower material cost for DIYers. | Higher upfront cost due to specialized machinery and professional labor. |
If you are trying to decide which style fits your home’s architecture and your budget, you can Learn more about professional gutter options to see how custom systems protect your property.
Planning Your Aluminum Gutter Installation
Before you run out to the local home improvement store to buy materials, you need a solid plan. A successful aluminum gutter installation is 90% preparation and 10% hanging.
First, grab a ladder and a tape measure. You need to map out the entire roofline where the gutters will be mounted.

When planning your layout, keep these regional factors in mind:
- The Pitch of Your Roof: Steep roofs shed water much faster than shallow roofs. If you have a steep roof, water will rush into the gutters with incredible force during a heavy Western Pennsylvania summer thunderstorm.
- Fascia Board Integrity: Carefully inspect your wood fascia boards. If they are soft, rotting, or pulling away from the rafters, they cannot support the weight of a gutter filled with water or heavy winter slush. Any rotted wood must be replaced before installing new gutters.
- Drip Edge Flashing: Ensure your roof has a functioning drip edge. The drip edge is a metal flashing that directs water off the roof and straight into the gutter, preventing water from wicking backward behind the gutter and rotting your fascia board.
For a deeper dive into the physics of rooflines and gutter preparation, check out the classic step-by-step guide on How To Install Aluminum Gutters – This Old House.
Determining Gutter Size and Downspout Placement
Choosing the wrong gutter size is one of the most common DIY mistakes. Standard residential gutters come in two primary sizes: 5-inch and 6-inch.
- 5-Inch Gutters: These are the standard for most mid-sized residential homes with average roof pitches. They are paired with 2×3-inch downspouts.
- 6-Inch Gutters: These are highly recommended for larger homes, properties with steep metal or tile roofs, or long eave runs where water concentrates quickly. They are paired with larger 3×4-inch downspouts, which can handle nearly double the water volume of a standard system.
As a general rule of thumb, you should plan for at least one downspout for every 40 feet of gutter run. If a run is longer than 40 feet, slope the gutter from the center outward to a downspout on each end.
Proper downspout placement is critical for foundation protection. In areas like Lawrence County and Butler County, PA, clay-heavy soils expand when wet. Discharging thousands of gallons of rainwater directly next to your foundation can crack basement walls and cause costly structural shifting. Ensure your downspouts discharge at least 5 to 6 feet away from your home’s foundation using splash blocks or buried PVC drain lines.
Materials and Tools Needed for the Job
To ensure your system stands up to heavy snow loads and torrential downpours, you must use high-quality materials. We recommend choosing a contractor-grade, heavy-gauge aluminum (at least .027 inches thick for standard residential use, or .032 inches for heavy snow areas). Avoid the ultra-thin .019-inch aluminum often found in cheap retail kits, as it bends under the slightest pressure.
The Essential Tool Checklist:
- Extension ladder with a ladder stabilizer (to protect your siding and gutters)
- Cordless drill and driver bits
- Tin snips (left and right-cutting)
- Hacksaw or miter saw with a non-ferrous metal blade
- Gutter crimping tool
- Pop rivet gun and 1/8-inch aluminum pop rivets
- Chalk line and laser level
- High-grade polyurethane sealant (such as GSL or equivalent exterior-grade gutter sealant)
- Stainless steel or heavy-duty structural screws (to mount hangers to the fascia)
For detailed technical specifications on how aluminum soffit, fascia, and rainware integrate seamlessly on a home’s exterior, review the Aluminum Soffit, Fascia & Rainware Guide.
Step-by-Step Guide to Aluminum Gutter Installation
Now that you have your tools, materials, and a clear plan, it’s time to get to work. Remember to prioritize safety: never work on a ladder during windy or wet conditions, and always have a spotter when working near rooflines.
Step 1: Preparing the Fascia and Calculating Slope
Gutters cannot run perfectly flat. If they do, water will pool in the center, collect debris, sag, and eventually overflow. To ensure proper drainage, your gutters must slope toward your downspouts at a rate of 1/4 inch of fall for every 10 feet of run.
- Find the High Point: Go to the end of the fascia board furthest from the downspout. Drive a screw into the fascia about 1 inch below the roof flashing.
- Calculate the Fall: Measure the length of the run. If the run is 30 feet, you need 3/4 of an inch of drop (1/4 inch x 3).
- Mark the Low Point: Go to the downspout end, measure down from the roofline the initial 1 inch plus your calculated fall (in this case, 1-3/4 inches), and drive a screw.
- Snap a Chalk Line: Tie a chalk line between the two screws, pull it taut, and snap it. This line represents the top back edge of your gutter.
While you are up there, inspect the wood behind the line. If you notice any soft spots, you may need professional help to repair the underlying structure before hanging the gutters. You can Explore our residential roofing services to see how we address structural wood rot and roof-edge flashing issues.
Step 2: Assembling and Hanging the Gutter Runs
It is much easier to assemble as much of the gutter run on the ground as possible before climbing the ladder.
- Cut to Length: Use your hacksaw or miter saw to cut your gutter sections to size.
- Install End Caps: Apply a generous double bead of polyurethane sealant to the inside edge of the end cap. Press it firmly onto the end of the gutter and secure it using a crimping tool or pop rivets.
- Cut Downspout Outlets: Mark the location of your downspout outlet. Use a hole saw or tin snips to cut a opening. Insert the outlet tube from the inside of the gutter, apply sealant around the flange, and secure it with pop rivets.
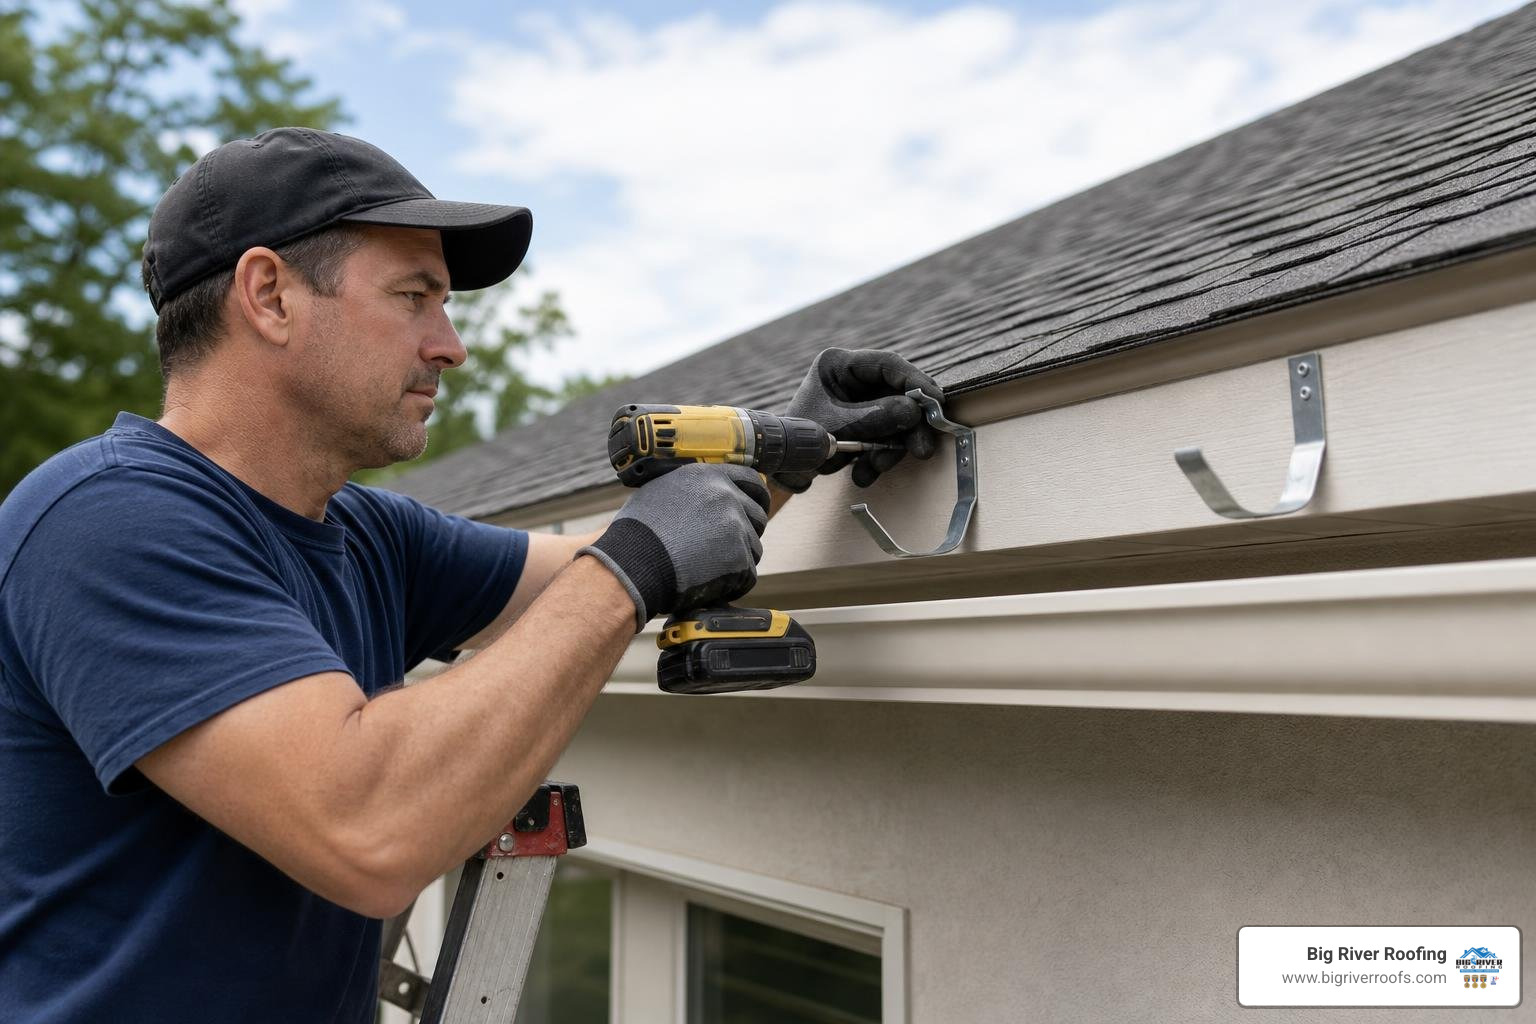
- Mount Hangers: Slide heavy-duty hidden gutter hangers inside the gutter trough every 24 inches. In Western Pennsylvania, where heavy snow loads are common, spacing hangers every 18 to 24 inches is critical to prevent the gutters from sagging or ripping off the fascia in the winter.
- Hang the Gutter: Lift the assembled gutter section up to your chalk line. Drive long structural screws through the back of each hidden hanger, through the fascia board, and directly into the rafter tails for maximum structural support.
Step 3: Downspout Attachment and Sealing
With the gutter runs securely mounted, you can now connect the downspouts to carry water safely to the ground.
- Assemble Elbows: Attach an elbow joint to the outlet tube sticking out from the bottom of the gutter. Use sheet-metal screws or pop rivets to secure the connection.
- Measure and Cut Downspout: Measure the distance from the upper elbow to the wall, and cut a short piece of downspout to bridge the gap. Attach a second elbow to route the downspout vertically down the side of your home.
- Secure to the Wall: Use aluminum wall straps (at least two for a single-story home, and three for a two-story home) to anchor the downspout firmly to your siding or brick.
- Apply Sealant: Seal all joints, end caps, and pop rivets with high-grade polyurethane sealant.
- Water Test: Let the sealant cure for at least 12 to 24 hours. Then, place a garden hose at the high end of the gutter run and turn on the water. Watch the flow to ensure water moves smoothly toward the downspout without pooling or leaking at the seams.
Maximizing the Lifespan of Your Aluminum Gutters
Once your new aluminum gutters are installed, a little preventative maintenance goes a long way. In our heavily wooded areas across Mercer and Beaver counties, leaves, pine needles, and twigs quickly clog open gutter troughs.
To keep your system running smoothly:
- Clean Twice a Year: Schedule a thorough gutter cleaning in late spring and late autumn.
- Inspect After Major Storms: Check for sagging hangers, loose downspout brackets, or signs of water overflowing.
- Account for Thermal Expansion: Aluminum expands and contracts as temperatures shift from below freezing in January to hot and humid in July. Avoid fastening gutter joints too tightly on long runs (over 40 feet) without expansion joints, as this can cause the metal to buckle.
Integrating Rainwater Harvesting and Water Conservation
While Western Pennsylvania isn’t an arid desert, water conservation and storm runoff management are becoming increasingly important for local homeowners. Heavy storms can overwhelm municipal storm sewers and wash away expensive residential landscaping.
Connecting your newly installed aluminum gutters to a rainwater harvesting system is an eco-friendly way to manage heavy downpours. By routing your downspouts directly into rain barrels or larger collection tanks, you can capture pure, chemical-free rainwater to irrigate your lawn, flower beds, and vegetable gardens. This not only lowers your summer water bills in Butler or Allegheny County but also reduces the volume of erosive runoff hitting your foundation during severe storms.
Professional vs. DIY Aluminum Gutter Installation
Hanging gutters yourself can save you money on labor, but it is important to weigh the risks and limitations.
The biggest limitation of DIY installation is that you are forced to use sectional gutters. Because 10-foot or 20-foot retail sections must be spliced together, your system will inherently have seams. Over time, the sealant in these seams will dry out, crack, and leak.
Professional gutter contractors, on the other hand, install seamless aluminum gutters. They bring a specialized roll-forming machine directly to your home on a truck. They feed flat aluminum coil into the machine, which extrudes a single, continuous gutter custom-cut to the exact length of your roofline. No seams means no leak points, resulting in a system that lasts decades longer.
Additionally, ladder work is inherently dangerous. Working on a two-story home, handling long, awkward metal segments while balanced on high rungs, carries significant safety risks.
If you live in Western Pennsylvania and decide that climbing ladders isn’t how you want to spend your weekend, you can Find Gutter Contractors in Mercer County to handle the heavy lifting safely.
When to Hire a Professional for Aluminum Gutter Installation
While a single-story ranch home with a straight roofline is a manageable DIY project, you should call in a professional if your home features:
- Multi-Story Heights: Working on a second or third story requires specialized safety harnesses, scaffolding, and commercial-grade ladders.
- Complex Rooflines: Multiple valleys, dormers, and wrapping corners require precise miter cuts and custom flashing to prevent leaks.
- Storm Damage: If a recent storm has damaged your roof, fascia, or existing gutters, a professional inspection is necessary to ensure the structural integrity of your home is restored before new gutters are hung.
Choosing the Right Contractor for Your Aluminum Gutter Installation
When hiring a professional, don’t just choose the cheapest quote. Look for a contractor who brings experience, local accountability, and proper credentials to the table.
At Big River Roofing, we provide manufacturer-certified installations and hold certifications with leading brands like IKO, Owens Corning, and CertainTeed. We believe in honest, face-to-face communication and offer free, comprehensive inspections to ensure your entire roofing and drainage system works in harmony.
If you want to make sure your home is fully protected before the next heavy rain season, you can Get a free roof and gutter quote from our local team today.
Frequently Asked Questions About Aluminum Gutters
How long do aluminum gutters last?
With proper installation, regular cleaning, and high-quality hanger spacing (every 24 inches), a quality aluminum gutter system commonly lasts 20 to 30 years. Using heavy-gauge aluminum (.027″ or .032″) ensures the system can withstand heavy snow and ice accumulation without warping.
What is the average cost of aluminum gutter installation?
The national average cost for professional installation of aluminum gutters ranges from $900 to $2,250, depending on the size of your home and the complexity of your roofline. Seamless aluminum gutters typically cost between $6 and $15 per linear foot installed.
How do I prevent leaks in aluminum gutter joints?
If you are installing sectional gutters, use a high-grade polyurethane sealant designed for outdoor use and thermal expansion. Clean the joints thoroughly with acetone before applying the sealant, overlap the sections by at least 2 inches in the direction of the water flow, and secure the joint with aluminum pop rivets rather than standard screws, which can rust.
Conclusion
Your gutter system is your home’s primary defense against water damage. Whether you choose to tackle an aluminum gutter installation as a weekend DIY project or hire a professional to custom-craft a seamless system, the key is attention to detail, proper slope calculation, and high-quality materials.
At Big River Roofing, we have spent years helping homeowners across Western Pennsylvania protect their investments. From Hermitage and Mercer to Beaver and Allegheny counties, we provide reliable, warrantied roofing, siding, and gutter services tailored to our local climate.
Ready to upgrade your home’s drainage system? Schedule your professional gutter installation today and let our experienced team handle the details for you.