Why Aluminum Downspout Elbows Matter for Your Home’s Drainage
Aluminum downspout elbows are the curved connectors that redirect water from your gutters down the side of your home and away from your foundation. Without them, rainwater has nowhere to go except straight down — or worse, back toward your home.
Here’s a quick overview of what you need to know:
| What You Need | What to Look For |
|---|---|
| Standard residential downspout | 2×3 or 3×4 aluminum elbow, A-style or B-style |
| Most common angle | 75° (most installations) or 45° (best flow) |
| Gauge | .019 aluminum — the industry standard |
| Typical colors | 20–31 colors with baked-on enamel finish |
| Fasteners | ¼” hex screws or pop rivets, front and back |
| Average cost | $3 to $15 per elbow depending on size and angle |
| Elbows per downspout | Usually 2, sometimes 3 for complex layouts |
Most homeowners don’t think about elbows until one cracks, pulls away from the wall, or starts sending water straight into the foundation. By then, a small fix has often turned into a bigger problem.
This guide covers everything — types, angles, sizes, installation, and maintenance — so you can make a confident decision whether you’re replacing one elbow or planning a full downspout upgrade.
I’m Don Kovac, owner of Big River Roofing, and after years of installing and repairing gutter systems across Western Pennsylvania, I’ve seen how the wrong aluminum downspout elbows — or a missing one — can quietly cause serious water damage. I’ll walk you through exactly what to look for so you get it right the first time.
Understanding A-Style vs. B-Style Elbows
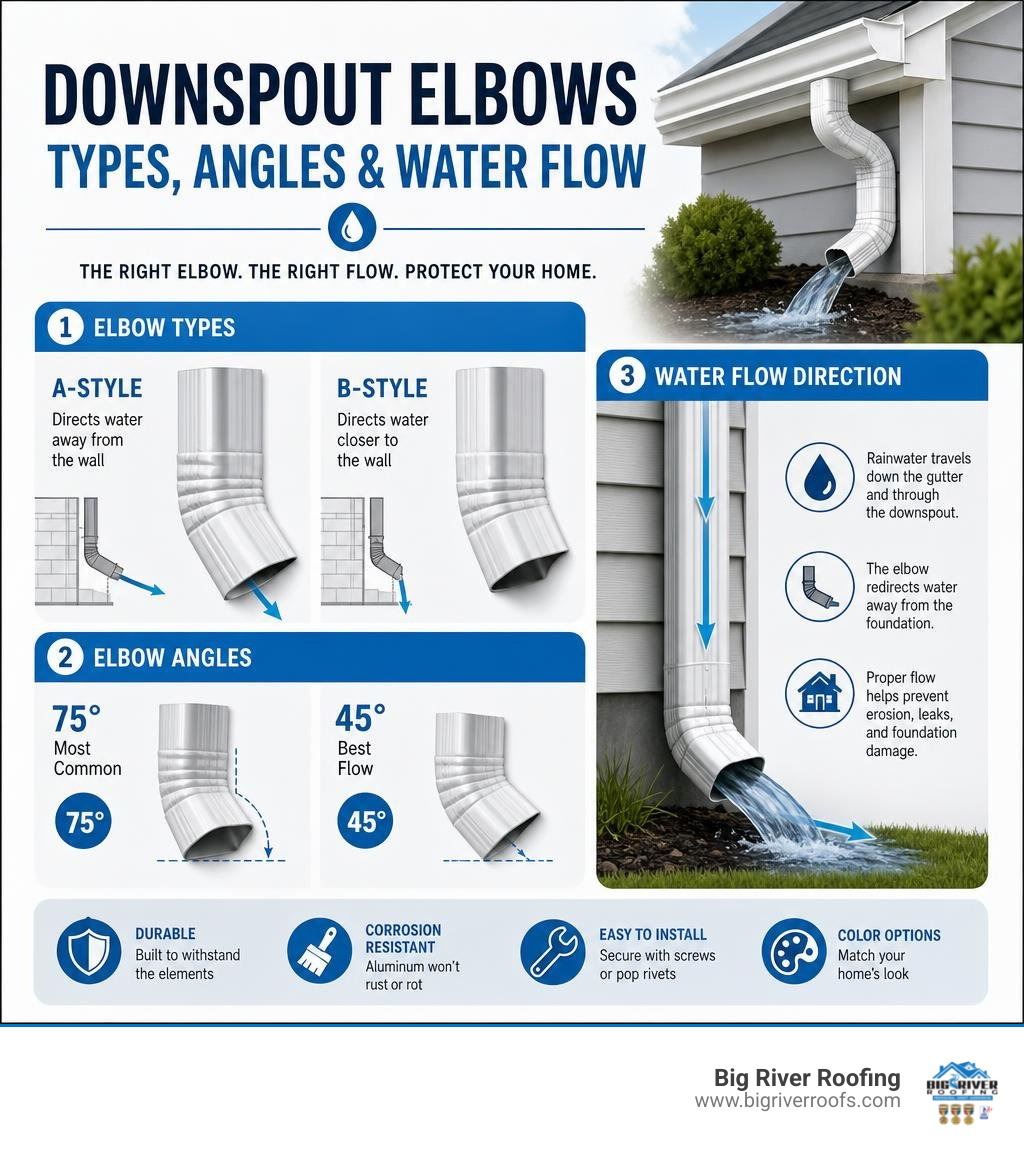
When you start shopping for aluminum downspout elbows, the first choice you’ll have to make is between “A-style” and “B-style.” Choosing the wrong one is a classic DIY mistake. They are not interchangeable, and buying the wrong style means your downspout will point in entirely the wrong direction.

The difference comes down to which way the elbow bends relative to the wide and narrow sides of your rectangular downspout. Let’s break down how this works and when to use each.
A-Style Elbows: Front-Facing Water Diversion
An A-style elbow bends forward or backward across its wide face. If you hold a rectangular downspout against your home’s wall so that the wide flat side is facing you, an A-style elbow will bend either directly toward you or directly away from you.
These are the most common elbows used in residential gutter systems. They are typically used at the top of the downspout to bring the pipe from the gutter projection back toward the house’s exterior wall, and again at the bottom to direct water away from the foundation.
If you are looking for a reliable replacement, the 2×3 A‑Style Aluminum Downspout Elbow – Durable Gutter Connector – Specialty Building Products is an industry-standard option built to handle standard residential water volume while keeping the profile tight to your siding.
B-Style Elbows: Side-to-Side Routing
A B-style elbow bends side-to-side across its narrow face. If you are looking at the wide side of your downspout, a B-style elbow will turn to the left or to the right.
These are highly useful when you need to route a downspout around a corner, navigate around a window well, or steer clear of an obstacle like a gas line, outdoor HVAC unit, or a bump-out in your siding. Instead of bringing the water forward, it allows for lateral routing along the face of your home.
Key Factors in Selecting Aluminum Downspout Elbows
Choosing the right elbow requires matching your home’s existing gutter dimensions, architectural layout, and water flow needs. Selecting the wrong angle or size can lead to premature clogs, leaks, and water pooling near your foundation.
Below is a quick reference table to help you understand the relationship between elbow angles, water flow velocity, and clog risks:
| Elbow Angle | Flow Velocity | Clog Risk | Best Use Case |
|---|---|---|---|
| 22.5° | Very High | Extremely Low | Tight clearances, offset transitions, and modern architectural routing |
| 30° | High | Very Low | Subtle direction changes, low-profile wall transitions |
| 45° | High | Low | Balancing directional control with high flow rates; reduces clogs by up to 70% |
| 75° | Moderate | Moderate | Standard residential drop from gutter outlet to wall |
| 90° | Low | High | Sharp turns around soffits or ledges (requires frequent cleaning) |
For a wide variety of configurations, you can explore standard options like those found at Downspout Gutter Elbows | 2×3 3×4 | Round – Aquabarrel LLC to match your home’s specific layout.
Sizing and Compatibility of Aluminum Downspout Elbows
To ensure a leak-free fit, your elbow must match the size of your downspout. The most common residential sizes in Western Pennsylvania are:
- 2 in. x 3 in. downspouts: Found on standard 5-inch K-style gutter systems. A typical white 2×3 A-style elbow (like the 2 in. x 3 in. White Aluminum Downspout A-Elbow) is highly affordable, usually costing around $4.83.
- 3 in. x 4 in. downspouts: Used for larger 6-inch gutter systems designed to handle heavy rainfall. A larger white 3×4 A-style elbow (such as the 3 in. x 4 in. White Aluminum Downspout A-Elbow) runs around $4.98.
- 4 in. x 5 in. downspouts: Often used on commercial properties or large homes with expansive roofs. These heavy-duty elbows generally retail around $9.42 each.
- Round downspouts: Typically 3-inch or 4-inch round configurations, which are popular on historic homes or modern architectural designs.
Understanding Elbow Angles: 22.5°, 30°, 45°, 75°, and 90°
The angle of your elbow determines how sharply the water changes direction. Sweeping, gradual angles keep water moving quickly, while sharper angles slow down the flow and can trap leaves, twigs, and pine needles.
- 75-Degree Bends: This is the industry standard for most gutter installations. It provides enough of an angle to bring the downspout from the gutter overhang back to the wall without sticking out too far.
- 45-Degree Bends: The professional favorite for maximizing water velocity. A 45-degree angle reduces turbulence, allowing debris to wash right through and reducing the risk of clogs by up to 70% compared to sharper bends.
- 22.5-Degree Bends: Perfect for tight spaces where you only need a very slight offset. If you are dealing with a small brick ledge or siding trim, a 2×3″ 22.5° Downspout Elbow – Style A Aluminum | Versatile Positioning | 25+ Colors | Damascus OR – Gutter All provides a highly precise, low-profile transition.
- 90-Degree Bends: While they offer the tightest fit against a wall, they are highly prone to clogging because debris cannot easily navigate the sharp turn. We generally advise avoiding 90-degree elbows unless space constraints leave no other option.
If you are looking for custom routing solutions with various angles, you can find them through specialized suppliers like Downspout Elbows – A/B Style 2×3 3×4 All Angles | GutterAll.
Material Specifications: Gauges, Ribbed vs. Smooth
The durability of your gutter system depends heavily on the thickness and design of the aluminum. In our Western Pennsylvania climate, where winter freeze-thaw cycles put immense pressure on seams, choosing high-quality materials is essential.
Ribbed vs. Smooth Aluminum Elbows
When choosing aluminum downspout elbows, you will have to choose between a ribbed (corrugated) or smooth finish.
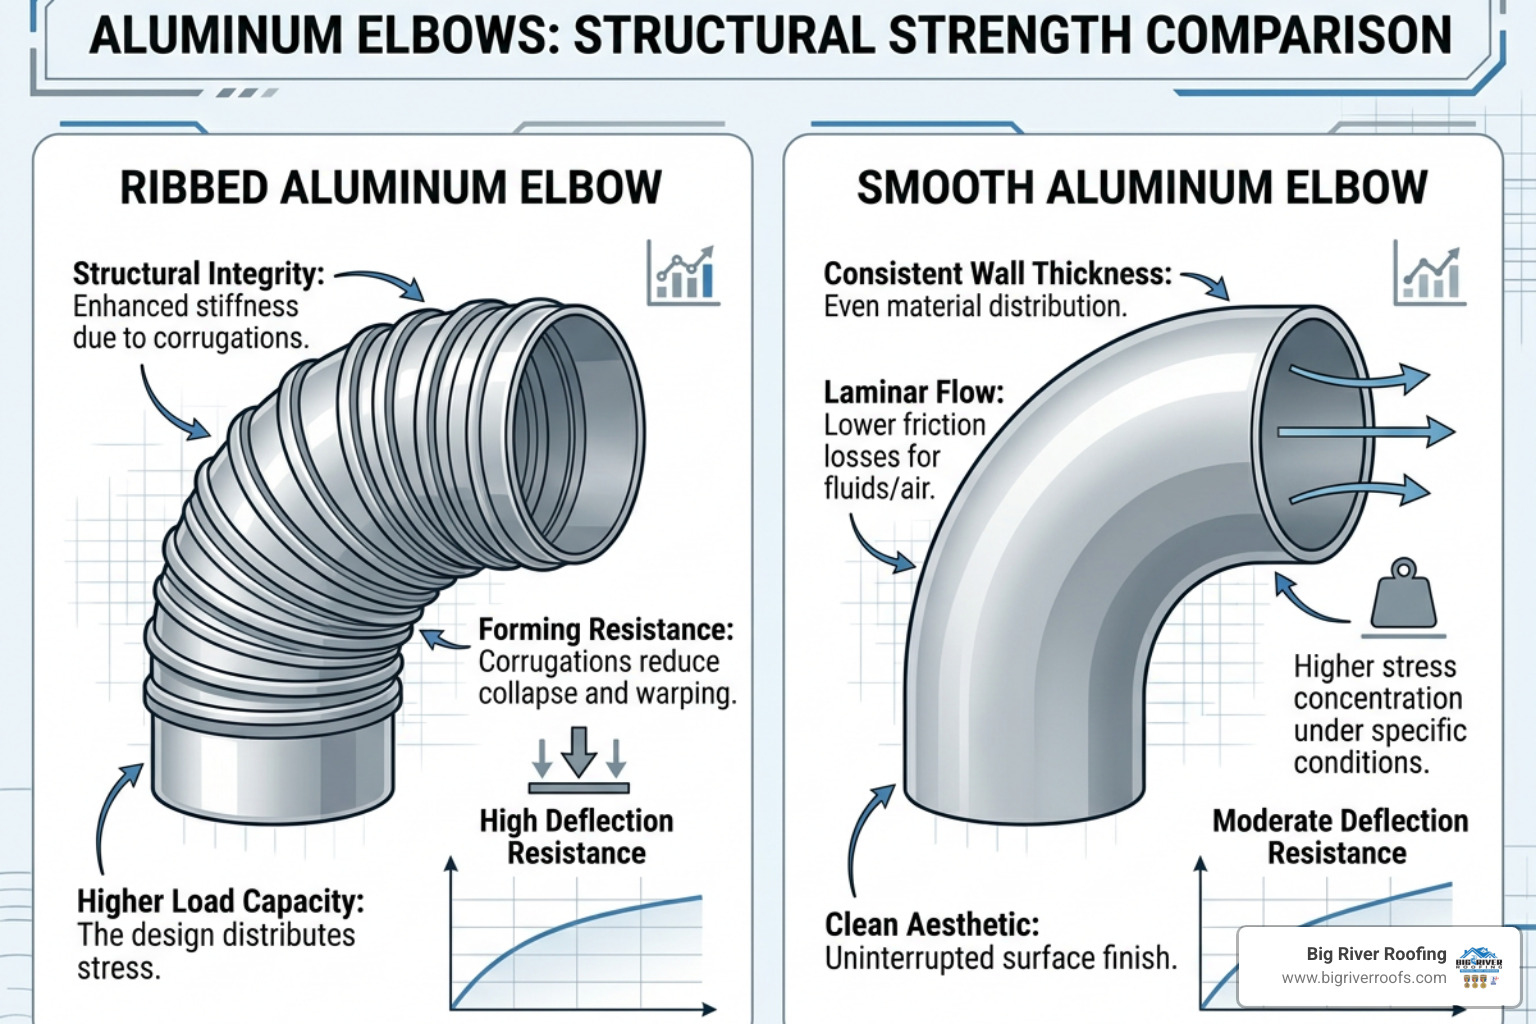
- Ribbed Aluminum Elbows: These feature a series of ridges pressed into the metal. This corrugated design makes them up to three times stronger than smooth elbows. The ribs help the elbow resist denting from ladder placement, impact from stray lawnmowers, and expansion from trapped ice. For homes in snowy areas like Mercer or Butler County, a ribbed elbow like the 2×3″ Downspout Elbow 45° Type A – Ribbed Aluminum | 25+ Colors | Damascus OR – Gutter All is the ideal choice.
- Smooth Aluminum Elbows: Smooth elbows offer a sleek, modern, and minimalist aesthetic. However, because they lack reinforcing ridges, they are more susceptible to denting and crushing under heavy snow loads or ice blockages.
Color and Finish Options for Aluminum Downspout Elbows
You don’t have to settle for plain white or metallic silver. Modern aluminum elbows feature baked-on enamel finishes designed to resist UV fading, chipping, and peeling.
Many manufacturers offer between 20 and 31 color options to seamlessly match your home’s trim, siding, or existing gutters. Popular choices include:
- Standard neutrals (White, Royal Brown, Musket Brown, Black, Clay, Beaver Brown)
- Specialty metals (Rustic Copper, Metallic Bronze)
- Historic tones (Colonial Gray, Forest Green)
For round gutter systems, products like the 3″ Round 45° Downspout Elbow – Aluminum | 25+ Colors | Damascus OR – Gutter All allow you to maintain a classic aesthetic while ensuring modern performance. If you have a dark trim package, options like the 3 in. x 4 in. Black Aluminum Downspout A-Elbow – The Home Depot can provide a bold, matching accent.
Installation and Connection Best Practices
Installing aluminum downspout elbows is a manageable task, but it requires precision. A poorly joined elbow will leak, dripping water down your siding and eventually causing wood rot or foundation erosion.
If you are planning a full upgrade of your drainage system, you can learn more about our professional gutter services to ensure your system is perfectly pitched and secured.
Step-by-Step Elbow Attachment
- Measure and Test-Fit: Always dry-fit your components first. Allow for a 1-to-2-inch overlap at each joint.
- Crimp the Upper Section: Water flows downward, so the upper piece must always slide inside the lower piece. Use a downspout crimper to crimp the bottom edge of the upper pipe or elbow so it fits snugly inside the receiving end.
- Apply Gutter Sealant: Apply a thin bead of high-quality, waterproof gutter sealant inside the joint before sliding the pieces together.
- Fasten the Joint: Secure the connection using ¼-inch hex-head sheet metal screws or pop rivets. Install fasteners on both the front and back of the joint to prevent wind and heavy water flow from pulling them apart.
- Secure to the Wall: Use downspout straps (brackets) to secure the assembly to your home’s wall. We recommend placing a strap every 6 to 8 feet to keep the system stable.
Determining Elbow Quantity and Custom Configurations
A standard downspout installation requires at least two elbows:
- Top Elbow: Connects to the gutter outlet and turns the flow back toward the house.
- Wall Elbow: Connects to the top elbow, turning the flow straight down along the wall.
- Bottom Elbow: Placed at ground level to direct water away from the foundation onto a splash block or into a drainage pipe.
If your home has deep soffits, brick ledges, or obstacles like HVAC lines or window wells, you may need a “multi-hit” configuration. This involves using two or more elbows back-to-back to create a custom offset.
Maintenance, Common Issues, and Western PA Climate Considerations
Here in Western Pennsylvania — from Hermitage and Mercer down to Beaver and Allegheny County — our gutter systems face tough conditions.
- Freeze-Thaw Cycles: When snow melts during the day and freezes at night, ice can build up inside downspout elbows. If the water cannot drain, it expands, splitting seams and loosening fasteners.
- Clog Prevention: Bends are the primary spot for clogs. Installing leaf guards over your gutters can prevent leaves from reaching the elbows in the first place.
- Joint Separation: Over time, wind, ice, and heavy rain can back out screws and break sealant bonds. Inspect your elbows twice a year — during spring and fall gutter cleanings — to ensure all connections remain tight.
If you notice sagging gutters or water backing up under your shingles due to clogged downspouts, check out our roof repair services to address any damage before it spreads to your home’s interior.
Frequently Asked Questions about Downspout Elbows
What is the difference between A-style and B-style downspout elbows?
An A-style elbow bends forward or backward along the wide face of the downspout, directing water toward or away from the wall. A B-style elbow bends side-to-side along the narrow face, directing water to the left or right.
Why is a 45-degree elbow often preferred over a 90-degree elbow?
A 45-degree elbow has a gentler slope, which keeps water moving quickly and reduces turbulence. This allows debris to pass through easily, lowering the risk of clogs by up to 70% compared to a sharp 90-degree turn.
How do I prevent my aluminum elbows from leaking at the joints?
Always insert the upper pipe inside the lower pipe (following the flow of water), seal the inside of the joint with waterproof gutter sealant, and secure the connection with screws or rivets on both sides.
Conclusion
Your gutter system is only as reliable as its weakest connection. Choosing high-quality aluminum downspout elbows with the correct styles, sizes, and angles keeps rainwater flowing safely away from your home’s siding, landscaping, and foundation.
At Big River Roofing, we pride ourselves on providing honest, durable, and manufacturer-certified gutter and roofing solutions across Western Pennsylvania. Whether you need a simple elbow repair in Hermitage or a complete gutter replacement in Beaver County, our team is here to help.
Ready to protect your home from water damage? Schedule a professional gutter consultation with Big River Roofing today!